Showing posts with label Veggie Week. Show all posts

8.08.2019

From the summer kitchen

With the deck project having taken away crucial barbecuing space this summer, and with the milder temperatures not preventing me from turning on the oven, it's been a slightly different kind of summer table spread. Here are the things I remembered to document:

For breakfast...


Dutch babies. I experimented with a couple different recipes, including a gluten-free variety, to get the perfect baby for all. These were a special request for Joel's dad's birthday breakfast.  Pictured here was the first try, and my favorite basic recipe from a 1974 Scandinavian cookbook from Sunset magazine (thanks, Mom!), baked in a cake pan. It has a little lemon zest and cardamom in the batter, which is simply nice. I mean, it's really hard to screw these up. But they always feel special.


Buttermilk sandwich bread...which I used for croque madames...in honor of the final stage of the Tour de France, which as I might have mentioned before, I won. 


Blueberry scones. Made on a slightly hungover Sunday morning after a night out with my gal pals, who sent me home on my bike with a pint of freshly picked blueberries in my pannier. I used a recipe for whole-wheat buttermilk scones that called for raisins, which I subbed with the berries. The scones were a tad dry (whole wheat flour AND oatmeal) so the berries added a nice burst of juice and flavor.


Baked banana buttermilk donuts. My local kitchen supply store had a sale during the 4th of July on all products that were made in the U.S.A., which included a donut pan I've lusted after for years, so I took it as a sign and bought it. Thanks, America. Because I had buttermilk and overripe bananas, I looked online to see how to combine it into donuts. We topped these with Nutella. It tasted more like a muffin. But donut shaped.

(If you can't tell, I seem to have a lot of buttermilk to deal with.)

For dinner:


Roasted dill salmon. Dill doesn't often get its day in our house, but I had a real craving for it and this recipe from the New York Times was quick and delicious. You simply make a marinade of 1/4 c. lime juice, 2 T. olive oil, 2 T. soy sauce, 2 T. maple syrup, 3 T. chopped fresh dill, 1/4 tsp. turmeric and a pinch of saffron (if you have it - I didn't), and a crushed garlic clove. Place salmon fillets skin side down on a lined rimmed baking sheet (smaller is better), season with salt and pepper, and pour the marinade over and let it sit for about 15 minutes as the oven heats to 425. Then transfer it to the oven for about 10 minutes and serve with rice or whatever. 


Sesame soba noodle salad with roasted mushrooms and tofu. It's probably one of my favorite meals and I don't make it often enough. It's so savory, crunchy (that's cucumber in there...not avocado) and satisfying and I'm always glad to have leftovers for lunch. The recipe comes from Melissa Clark's Cook This Now...like so many recipes I post on this blog.


Soupe au pistou. I held onto this recipe from my Milk Street mag a couple months back for pesto season. It's weird because you'd think the last thing you'd want to make in summer is soup, but this celebrates all its flavors and it was so, so good. Fresh tomatoes, green beans, carrots, beans, garlic and small pasta go into the soup, and the pesto is added as a garnish. It's nice to have a partner who works from home and can prep this on a weekday afternoon and tend to it as needed (cooked from dried beans), otherwise this would have definitely been a weekend meal. 


Chicken Milanese with tomato, mozzarella and basil salad. Because after a long day, it feels good to take a meat pounder to some chicken cutlets. The basil dressing that goes with this is divine. Another gift from Melissa Clark via the New York Times.

Chicken tinga tacos. This is something Joel makes and it's one of my forever favorites. I don't care about other recipes for chicken tacos or burritos anymore. I contribute the pickled onions and a side of Rancho Gordo beans. 

For dessert:


Smoked paprika peanut butter cookies. I got the recipe from David Lebovitz's blog and was totally starstruck (in the nerdiest of ways) when he shared my post on Instagram and used it as an opportunity to link to the recipe again. To be honest, I was expecting more smoke, but ultimately these were just strangely colored but very delicious, chewy peanut butter cookies. 


S'mores blondies. If these aren't viral on the internet yet, they will be. Gooey as all get-out. I took to calling them power bars. 

6.01.2019

The Stew

I am extremely conscious about the ways we elevate things only to ruin them. Millennials - my generation - are great at this, mostly because we have the internet to heighten and accelerate the process - though I think every generation is drawn to this phenomenon. And once we've ruined things, we look for other things that were ruined or viewed as uncool or unhealthy by a previous generation (e.g., mayo, MSG, Bob Ross) and give them new life.

As a result, I greet every new trend with an appreciation for Newton's Law. When I hear about something that everyone love-love-loves, I anticipate backlash and keep my distance as long as possible. You may view this as a negative way to view the world, a sad form of self preservation, or just a symptom of the times we live in. I do, too, but I'm fine with it. And yet, in trying so hard to avoid trends, I'm finding that I'm not immune to the sway of the pendulum. I want know what everyone is raving about and why. I just may be a late adopter.

So what bandwagon did I most recently, finally, jump on? I made Alison Roman's #TheStew, a spiced chickpea stew with coconut and turmeric. Roman is a big deal among millennials right now because  home cooking is a big deal (a result of our budgets), and in true millennial fashion, we hashtag it like everyone knows about it, because why waste time explaining when there's the internet? And we exalt Alison Roman not only because recipe developers are finally getting their due, but because it's not enough to just like the food - you can't have a good cult-like following without a leader (see also: Samin Nosrat). She invented the ever-popular chocolate chunk shortbread cookies (a.k.a. #TheCookie), which I made, of course, and loved. And thus we decided everything she gave us is gold. It's very possible that Alison Roman's next career move is to have a Netflix show.

But back to the food: In the case of #thestew, I knew based on ingredients alone that I would like it but wanted to guard any enthusiasm I might have by trying to find something that could have been improved. I did reduce the amount of coconut milk a tad (two cans is a lot - not just from a richness standpoint but for the liquid element of it), and I put the chickpeas you're supposed to reserve for garnish back in the stew at the end because I didn't want cold chickpeas on my stew and there's no point in trying to make this dish pretty.

It was a delicious meal - a hearty, affordable, meatless stew that is worth some hype, regardless of trendiness. Even if Alison Roman eventually (sadly) becomes part of a trend we eventually move on from, or if we discover that chickpeas cause cancer and climate change, this is a recipe worth trying now, while it's hot. I don't think it's any better than other delicious meals you might cook at home - I think it's just surprising to a lot of people how filling and satisfying chickpeas are, and with coconut milk and vitamin-packed greens, how diet-conforming this meal is. Call your vegan coworkers, your gluten-free pals, your lactose-intolerant relatives and have a freaking dinner party again. Because dinner parties are trending (because, you know, home cooking) and you better have something ready. Just don't forget the hashtag when you post about it.


5.21.2019

Shaved asparagus pizza

Red sauce will always have its place, but I'm discovering how much I love sauceless pizza. Spring veggies with their delicate flavors would be overpowered otherwise.

Here's my take on Smitten Kitchen's Shaved Asparagus Pizza. Per her suggestion, I added red pepper flakes and topped it with egg, but since I also had some leftover roast potatoes, I added those, too. Marvelous.

Shaved Asparagus Pizza

One half-pound of prepared pizza dough (or enough for one pizza size of your choice)
1/2 pound fresh asparagus
Leftover seasoned roasted potatoes, sliced into smaller pieces if large
1 ball fresh mozzarella
1/4 c. freshly grated Parmesan
Olive oil
Salt and pepper
Red pepper flakes
Egg
1 scallion, white and light green parts thinly sliced

1. With a pizza stone placed on the lower oven rack, heat the oven to 500+ degrees.

2. Wash the asparagus. Holding onto the base of the spear, use a vegetable peeler to peel long strands. It helps to do this against a cutting board. The peeler blade may get clogged sometimes, but the point is to pile asparagus shavings and bits on the pizza, so don't worry about it as long as you've got thin slices. Toss the peels in a large bowl with olive oil, salt and pepper. Discard the woody ends of the asparagus. 

3. Spread out the pizza dough to your desired thickness using whatever method you like (press into a pan, or roll it out and place on a peel, etc. - I have a whole explanation of my methods here).

4. Top dough with Parmesan, then dot with mozzarella (I like to tear it into small chunks and place them a couple inches apart on the pizza). Scatter the roast potato, then pile on the asparagus. Sprinkle with red pepper flakes (to taste). Slide into the oven and bake for 10 minutes.

5. Around the 5 minute mark, heat up a small frying pan with a little oil. When hot, add an egg and fry, being careful not to let the yolk overcook. Ideally, the egg should still be cooking when you take out the pizza. A poached egg would also be a nice option. Alternatively, you could crack the egg(s) directly on the pizza around the same time and let it cook in the oven. I haven't worked up the nerve to do this.

6. Take out the pizza. The asparagus should be slightly browned/charred around the edges. Top with sliced scallions and fried egg. Break the yolk a little and spread it a bit over the middle of the pizza so each piece gets an eggy bite. Slice and enjoy. 


5.17.2019

Carrot and Leek Tart

Because it's spring and the farmers' market should have an abundance of leeks and carrots, I am digging this recipe out of my recipe binder archives (handwritten from who-knows-where, circa 2008) to share with anyone who wants something fancy and seasonal. I made it this week for book club and have been enjoying the remnants for lunch.
Pictured at the bottom here...book for scale

Start to finish: 2 hours (due to cooling)

Yields 8 slices. Great for pairing with a salad for a main course.

Tart pastry

1 c. flour
1/4 tsp. salt
2 T. slivered or sliced almonds
4 T. unsalted butter, cold and cut into 1/2-inch dice
2 large egg yolks
1 T. ice water

In the bowl of a food processor, combine the flour, salt and almonds and pulse until almonds are coarsely ground. Add the butter and pulse a few more times (some large butter chunks are OK), then add the egg yolks and ice water and pulse until dough holds together when pressed. Turn the dough out onto a sheet of plastic wrap or wax paper and press into a disc, wrap completely and refrigerate for 30 minutes while you prep the filling.

Filling

A little more than a pound of carrots, peeled and sliced in 1/4-inch rounds
2 large leeks, whites and light greens sliced into half moons, rinsed thoroughly
1 tsp. fresh thyme
2 T. chopped parsley
Salt and pepper
2 T. olive oil
2 T. unsalted butter
2 large eggs
1 c. Parmesan cheese

Heat the oven to 350 degrees.

Heat the olive oil over medium high in a large skillet, then add the leeks and a generous pinch of salt. Cook, stirring often, until leeks are softened and beginning to color, about 6 minutes.

In a large saucepan, combine carrots, 3/4 c. water, thyme, parsley and butter, and salt and pepper to taste. Heat over high until it boils, then reduce to a simmer. Cook until most of the liquid is evaporated and the carrots are cooked, about 20 minutes. Remove from heat and prepare the tart pan.

(We'll get to the eggs and cheese in a moment.)

Tart assembly

Butter or spray for pan
Fine breadcrumbs
1/2 c. Parmesan

Generously grease the sides and removable bottom of a tart pan. I have a small 8-inch pan, so I always end up with extra pastry and filling, but it should fit a standard-sized pan or any shape you wish (including smaller individual pans). Coat the inside with the breadcrumbs and set aside.

Roll the chilled pastry to 1/8 inch thickness and place in the tart pan, gently pressing it to fit in the corners and fluted sides. Place the tart pan back in the fridge while you finish the filling.

Remove about a 1/4 c. of carrot slices for the topping (the original recipe specifies 66 uniform slices, but that's tedious and just for looks). Place the rest of the carrots in the food processor with the pan liquid along with the leeks and pulse 5 or 6 times, but don't puree them. Taste the mixture. If it needs a little salt, add it here.

In a large bowl, combine the carrot-leek mixture with 1 cup of Parmesan, 2 eggs, and a few grinds of pepper and stir until evenly mixed.

Grab your tart pan and spread the mixture evenly on top (you may have more than you need). Top with the reserved carrot slices, then sprinkle with 1/2 c. Parmesan.

Bake until well browned and completely set, about 35-40 minutes. Cool completely before removing the tart from the pan to slice. Serve at room temp.


10.30.2018

Tuesday Soup

Tuesday Soup is something I invented on a Tuesday night, believe it or not. It was also the Tuesday when we didn't win the Mega Millions lottery and its economical ingredients firmly put us in our place as less-than-billionaires. I brought a leek home from the grocery store, pulled some aging broccoli and celery out of the fridge and started chopping. It all went into a pot with butter, smashed garlic, parsley and chicken broth. This was my reminder that you truly don't need much else to have a winning soup on the table in an hour. A fresh loaf of bread (the reason for making the soup in the first place) and a beer rounds this meal nicely. It's nothing fancy, but it's kinda healthy and a good middle-of-the-week dinner.

Tuesday Soup

Ingredients

1 T. butter
1 large leek
1 large head broccoli 
2 stalks celery
2 large or several small cloves garlic
Several sprigs parsley
5 c. chicken stock (or water, or combo)
Lemon slices, for garnish (or lemon pepper is nice, too)
Kosher salt
Pepper

Directions

Thinly slice the white and light green parts of the leek and rinse thoroughly. Cut off the large broccoli stems, thinly slice and add to the leeks. Chop the florets to small chunks and set aside. Chop the celery and add to the leeks and broccoli. 

Heat a stock pot to medium heat, then add the butter. When the butter is melted, add the leeks, broccoli stems and celery and a good toss of kosher salt (1-2 tsp. depending on your taste). Saute for 10-15 minutes until the vegetables are soft and slightly browned, with brown bits on the bottom of the pot. 

Smash the garlic cloves with the back of a knife and add those to the pot. Let them sizzle for a few minutes until very fragrant. Add the broccoli florets and parsley sprigs, followed by the stock/water. The liquid should just barely reach the top of the veggies and look fairly snug; you don't want swimming vegetables. Cover and simmer over low heat for 10-15 minutes. Check with a fork for doneness - the large chunks should be very tender. 

With a blender (or immersion blender), puree the soup until smooth. Add salt and freshly ground pepper to taste. 

Serve with a squeeze of lemon (to taste), or a swirl of yogurt or sour cream. Crispy bacon or homemade croutons would make nice additional garnishes! Better yet, serve with a fresh crusty loaf of bread or grilled cheese sandwich. 

11.21.2017

Buttery weekend

Last weekend we were at Auntie's Bookstore and I got that familiar feeling of being overwhelmed by the number of books I will never read. Or the cookbooks I will never cook from.

But worse, holy lords!, my conscience nags, think of all the books that are just sitting on my shelves at home right now, books that are half-read, cookbooks that are barely weathered.

Rather than buying anything new, I returned home and hung out with my books. It's a weird combo of feeling a little depressed and a little grateful. Look at all I don't have. Look at all I do have. Hey, it's the holidays. This feels appropriate.

Rhubarb compote
Also appropriate in this moment: butter-laden recipes. In November and December, butter is cheap, and there are likely things sitting in your freezer or on your counter that could easily be transformed into a sweet or savory filling in a buttery tart dough.

So in the spirit of appreciating what I already have, in one Saturday, I used one well-loved cookbook and one pound of butter to do just that - dinner (big savory tart) and dessert (sweet mini tarts). The cookbook was Deb Perelman's The Smitten Kitchen Cookbook. It's been awhile since I've tried anything new out of it.  (And I've since been tempted to buy her brand new cookbook.) Trying new recipes gives new life to older cookbooks, and until Saturday, this one's pages were mostly well-worn in the pizza dough section (I've since memorized her recipes for pizza sauce and rushed pizza dough).

First, I rid my freezer of rhubarb and made her recipe for rhubarb hamantaschen, starting with a simple rhubarb compote.

This is a cookie that's traditionally eaten during the Jewish holiday of Purim. I'm not Jewish, and it's not Purim, but each time I page through the cookbook these catch my eye. They're so pretty, and in the last few years I've become a real fan of jammy cookies.

It was only after I put these in the oven that I learned how difficult it can be to keep the corners together. But I still got a few good triangles, and the taste was what mattered most. If you'd like the recipe, here is one blogger's very enthusiastic transcription of it. 

I didn't let these floppy corners get me down
After a couple of hours, I continued on. Next up in my Smitten Kitchen Saturday was a butternut squash galette.

This tart dough, by comparison, was just as I'd hoped: flaky and melt-in-my-mouth. And it was a dream to work with. I used a combo of white and whole wheat flours, and mixed it with nonfat Greek yogurt and white balsamic vinegar in addition to a stick of butter. The contents included roasted butternut squash, caramelized onions, fontina and fresh thyme (the cookbook calls for thyme, though her original website recipe calls for sage; either would be lovely I'm sure), with just a pinch of cayenne pepper. Pair it with a salad and you really need nothing else for a complete meal.

I only remembered to get a photo of the finished product, right before we sat down to watch The Big Chill (how have I lived my whole life without seeing this movie?!).


I highly recommend this recipe.

I know what you're wondering to yourselves: How does one handle all this butter on a single day? Turns out, you don't need to eat everything in one sitting. You can spread this out over several days or even a week. Enjoy every single bite, savor slowly, and double your normal vegetable intake for awhile. If you feel your conscience try to guilt you about it, be grateful for the very thing that is sitting in front of you on your plate. It's the holidays. This is appropriate.

9.23.2015

These beans

When I was 5 or 6, my sister and her friend rewrote the lyrics to Top 40 hits of the day and recorded them on cassette tape. They were hilarious. I loved it because it was humor I could understand at that young age. I remember them spending more than one occasion turning songs like Whitney Houston's "Saving All My Love" into a song about a sandbox romance called "Saving All My Mud," and, as pertains to this post, Heart's "These Dreams" into "These Beans." The lyric "White skin...in linen..." became "Green beans...on china..." and to this day, the rewritten chorus gets stuck in my head: "These beans go on when I close my eyes..."

Which brings me to yet another post about beans. These beans are not the most attractive. But I will say they are among the best I've made. I did not plan ahead but I did have a free Saturday morning to quick-soak them (bring beans to boil in plenty of water, boil for a minute, then cover and leave off heat for an hour), as opposed to soaking them overnight. These beans turned out just as tender and creamy, and were ready by lunchtime. While they cooked, I washed windows. Several days later, as we ate the last serving of the beans, a bird had pooped on those windows. Seriously. Do shiny surfaces just encourage avian relief? "White poop...on window..."

Anyway, these beans are good. I'm trying to eat fewer carbs these days (greetings, My 30s Metabolism), but beans, these or otherwise, are simply part of a well-balanced diet. Take or leave the bread - I would be happy to add a bit more liquid and just call it soup. The roasted garlic makes it rich and sweet. The thyme adds a tingle. Just close your eyes and you will see, truly, that these beans do go on, as the reimagined song goes.


Here's the recipe:

These Smothered Beans (adapted from Food 52)
serves 4

1/2 lb. dried white beans (cannellini or Great Northern), pre-soaked
1 T. olive oil
1 small onion, diced
2 stalks celery, diced
2 bay leaves
1 head of garlic, top cut off to expose cloves
olive oil
1 tsp. kosher salt (or to taste)
freshly ground pepper, to taste
1/2 tsp. dried thyme (or to taste)

Preheat oven to 400F. Place garlic on a small sheet of foil and drizzle with enough olive oil to coat the tops of the cloves. Wrap the foil around it completely and set on a baking sheet. When oven is preheated, bake for 35-40 minutes, until the garlic is tender. Unwrap and let cool.

Meanwhile, saute celery and onion in a large pot in the olive oil over medium heat. Once the vegetables become translucent and tender (7-10 minutes), add in the bay leaves and beans and enough water so it is about an inch over the beans. Stir, bring to a boil, then back down to a simmer. Cover and cook 50 minutes, or until the beans are becoming tender. Simmer uncovered for another 10-15 minutes. Skim most of water off the top and then add the salt, pepper and thyme. Squeeze the garlic cloves into the pot and mash bean mixture with a potato masher to your desired consistency. This mixture will thicken with time, and it stores well in the fridge for a few days. Serve warm with toast!

6.23.2015

Baked falafel: attempts at vegetarian-ish-ism

When some dear friends visited us from Petaluma - vegetarians, all - earlier in June, they presented us with a jackpot of Rancho Gordo beans. I was so thrilled to try these for myself after hearing so much about them. Between that gift and thinking only in terms of non-meat dinners that week, I felt myself get back into the veggie groove. Sometimes I forget how many flavors I have at my disposal when meat is out of the equation. To be honest, I would be perfectly happy eating a plate of beans, Rancho Gordo (which are, in fact, all they're chocked up to be) or otherwise, with a smattering of herbs for dinner, or fresh tomatoes and cheese on toast, but I also know someone else in this house might not find it substantial enough. A vegetarian dinner that both of us can enjoy definitely is not impossible, but right now it's mostly limited to pasta and soup. And hot soup loses its appeal when the temps are in the upper 90s (i.e., mid-80s in the house).

Aside from the ethical and health reasons I've believed as good ones for eating less meat, the thing I'm realizing as one of the best things of vegetarianism is the economy of it. A pound of dried beans is enough to feed a couple people for at least two nights with leftovers for a lunch or two.

Feeling inspired and well-equipped with bean varieties, I charged on in my quest to build my vegetarian-for-two repertoire. My latest inspiration came from a Mark Bittman recipe for baked falafel - something I'd only made for myself until now - which I presented with confidence to my dining companion. "Do I like tahini?" he asked. There was only one way to find out, I replied. To my delight, we both enjoyed this dish and the tahini sauce that accompanied it.

The link to the Bittman recipe is here, though I must note that I un-veganized his tahini sauce. When I whisked the tahini paste with the water, there was just too much separation and I had trouble emulsifying it without a spoonful or two of Greek yogurt. I also added lemon juice for flavor. You can use this sauce - my version - as a yummy vegetable dip or dressing on hearty romaine salads, too.

We made pita sandwiches with lettuce, tomatoes, and cucumbers. Are you as frustrated as I am by store-bought pita bread when it comes to actually using the pocket function?  The only time I got a pocket was when I made them myself (and I wasn't about to do that this time around). These were too gummy to wiggle a knife into without ripping, so we just split the whole thing in half and made a sandwich that way. Still good.

5.27.2015

Monique's Orzo Salad Formula


In a resourceful, conscientious effort, I have spent many a Sunday afternoon putting together a new recipe for a grain salad to enjoy during the work week - mostly to take the frantic lunch assembly out of my morning routine. On Monday, I pat myself on the back during the lunch hour because this looks so much better than peanut butter and jelly. By Wednesday, though, things change. I don't always know why exactly, but I slightly cringe at the thought that I've got this thing for two more days.

So a month or so ago, after enduring another revolting but lovingly made lunch, I made myself a list of the tastes and textures that always taste good to me, things I always look forward to come lunch time. Through that process, I made the freeing decision that I should not put onions in things, because they were one of the primary culprits in making my salads less desirable as the days went on, as were grains pre-dressed in vinaigrettes. From there, I made a list of things that I will actually eat after four days, like taco and greek salads, or a tomato soup with chickpeas. This sounds really basic, but I can't tell you how much it's helped. While my grain salads have always been aspirational - the things I should be eating - I've decided that most are best left as one-offs, or better yet, side dishes, complements to what I REALLY want to eat.

Hooray, this orzo salad made the cut. It's great as a side, but I also love it as my main sustenance, sometimes on a bed of greens and/or with an orange. My friend Monique brought it to a party and when I asked her for the recipe, she just gave me a basic formula that can be altered to whatever I have on hand. That's what makes it impossibly easy and almost always doable.

Ingredients:

Toss in a large-ish bowl:

1 c. orzo, cooked al dente
Olive oil - just enough to keep the orzo from sticking together
Salt and pepper to taste

Then add, in quantities that look reasonable to you...

Goat cheese (or another soft/salty cheese, like Feta or Gorgonzola)
Dried cranberries (or raisins, currants, cherries, sliced grapes, even)
Chopped parsley (or even basil)
Toasted almonds (or pine nuts, pistachios, walnuts)

Stir well and enjoy over however many days you need!


10.29.2014

Best self, best shelf

A couple weeks ago, I got a do-over. We have a lovely little room that wasn't getting much use - technically my "Kraft Zimmer" (translation: power room, with the intentional Kraft/craft confusion). It ended up being more of a place to fling stuff, stuff which I'd later pick up anytime I actually needed to use the room for sewing projects or ironing. Because I didn't want to deal with de-cluttering, I tossed aside many sewing projects and almost completely dismissed the need to iron anything. But Joel surprised me one day by clearing out the old futon that was in there, making way for  whatever I could dream up for the space. I started envisioning walls of bookshelves, cute organizing baskets, ripping off the wallpaper, and a bundle of other ideas, but in the end, a little reorganization of stuff I already had was just what I needed to start making this little room a cozy space that we actually wanted to spend time in.

I cleaned out a bookshelf and put in all the books that inspire my creativity. That meant hauling cookbooks in from the kitchen and organizing my craft books by type. I'm spending so much more time with them now because I can see them so clearly from the cozy chair in the corner.


Last Sunday morning, I laid on my stomach with a bunch of cookbooks open to things I wanted to make in my immediate future.  I consulted my giant I Know How to Cook book and bookmarked the recipe for Potage Bonne Femme, a delicate vegetable soup. With a fresh loaf of bread, it turned out to be a lovely rainy day dinner that lasted a couple days. In this season when I feel like I have to make recipes with squash but don't want to deal with peeling the dang things, this is a great alternative. See, it even looks squashy.


Potage Bonne Femme
Adapted from I Know How to Cook by Ginette Mathiot

2 large leeks, or 3 medium ones, white and light green parts, sliced fairly thin
4 carrots, peeled and diced
5 small Yukon gold potatoes, peeled and diced
1 T. unsalted butter
6 c. water
2 whole cloves
2 bay leaves
Salt and pepper

for finishing
Heavy cream
Minced chives

Melt the butter in a large saucepan over medium. Add the veggies and cook with a good pinch (or more) of salt and pepper, stirring occasionally, until they begin to soften, about 5-7 minutes. Don't let them brown. Add the water (freshly boiled water is ideal), cloves and bay leaves and simmer for about 30 minutes, until the vegetables are quite tender. Remove the cloves and bay leaf. At this point, you can stir in cream and season to taste, or, if you like a blended soup, as I do, take your immersion or regular blender and puree the soup. Stir in a glug of cream, season with salt and pepper to taste, and spoon into bowls. Top with chives.

Serve with warm, crusty bread or toast.


8.12.2014

Chickpea cakes: when your food could be a petname

I had the whole place to myself on Saturday night (plus the dog and cat), and when that happens, I usually fix a meatless dinner. So it was me and chickpea cakes in a nice romantic setting, with a bright little tomato salad and mini bottle of Prosecco. Because why not?

And several episodes of Mad About You. I just can't help it.

The recipe is from America's Test Kitchen's The Best Simple Recipes magazine (they call it a bookazine, apparently), which promises "foolproof recipes that cook in 30 minutes or less." That's only true for about half of those I've made (quicker the second time around, usually), but regardless, they are simple, and they are reasonably quick, for ATK.

Chickpea cakes with Cucumber-Yogurt Sauce
adapted from America's Test Kitchen: The Best Simple Recipes bookazine

For the chickpea cakes:
2 slices hearty sandwich bread, torn into pieces
2 large eggs
2 15-oz cans chickpeas, drained and rinsed
1/2 c. 2-percent Greek yogurt (you'll need more for the sauce - see below)
1 shallot, minced
1 tsp. garam masala
1/8 tsp. cayenne
3 T. scallions, thinly sliced (slice more for the sauce - see below)
1/4 c. olive oil

Preheat oven to 350 degrees and adjust oven rack to middle position. Process the bread pieces in a food processor until course crumbs, about 10-12 pulses. Spread crumbs on a rimmed baking sheet and bak 10-12 minutes. Cool completely. Make yogurt sauce while bread crumbs bake (below).

Whisk eggs, 2 T. oil, garam masala, cayenne and 1/4 tsp. salt in a medium bowl. In a separate large bowl, mash chickpeas with a potato masher, or by hand if it's easier (it was for me). Pour egg mixture in  with the chickpeas and add the shallot, bread crumbs and 1/2 c. yogurt (not the sauce you just made), and scallions, and mix well. Let the mixture sit for a few minutes to firm up a bit.

Form the mixture into 6 to 8 1-inch cakes.

Heat up 1 T. oil (or more, if you're not using nonstick skillet) in a large skillet over medium heat until shimmering. Add 3 cakes and cook until well browned, 4-5 minutes per side. Transfer to a plate and tent loosely with foil. Repeat with remaining cakes.

Serve with cucumber-yogurt sauce


For the cucumber-yogurt sauce:
1 medium cucumber, peeled, halved, seeded and shredded
1/2 tsp. salt, plus more to taste
Pepper to taste
3/4 c. 2-percent Greek yogurt
2 T. scallions, thinly sliced
1 T. cilantro (I didn't have this and it tasted just fine without)
1 tsp. (or more) freshly squeezed lemon juice


5.14.2013

Pear and goat cheese flatbread with greens

Since I last posted, lots and lots started going on. Lots of travel planning, lots of party planning, lots of supremely warm weather, lots of really good time with old friends. I kind of forgot I had a blog, which is an internet sin. Please forgive me.

I turned 31, seemingly the other day, and it's usually around my birthday when I feel extra convicted to be really good to myself. This is as much about staying up late with dear friends and drinking a smidge too much wine as it is getting good sleep and eating healthy food. I had a glorious combination of both this past week after a girls' weekend with college friends and a night I spent mostly on my own.

Whenever I'm on my own, I treat myself to a recipe with mustard or goat cheese or any other ingredient that I don't normally fix with my guy. I kind of think he would have liked this pear and goat cheese flatbread had I forgone the mustard, but now I know what the mustard adds. Frankly, I would have used less of it. But whatever, this was still sweet and savory and everything you want a flatbread to be on a balmy evening spent alone.


Pear and Goat Cheese Flatbread
inspired by the Sprouted Kitchen

Small ball of dough (I used the whole wheat dough I have on hand in the fridge, using the Artisan Bread in 5 method)
1 small onion, thinly sliced
2 tsp. olive oil
1/4 c. goat cheese
1 T. whole grain mustard (optional)
Small ripe pear, thinly sliced - you choose the variety (I used Bosc)
Generous handful of tasty greens, like arugula, though I used a combo of microgreens I already had
1 tsp. balsamic vinegar
2 tsp. olive oil
salt and pepper

Caramelize the onions: warm the first 2 tsp. olive oil over medium heat and cook onions until soft and brown, about 15-20 minutes (or longer for truly caramelized onions...I'm usually too impatient). Set aside.

Roll out the dough until fairly thin, making sure it will fit in your grill pan (you can also put this directly on the grill). Heat a dry, clean grill pan over medium high heat. Cook the dough about 2-3 minutes per side, allowing for some nice char lines and irresistible dough bubbles. Meanwhile, turn on your broiler and grab a broiler pan, and find a cooling rack for the counter. Once the dough has been cooked on the grill pan, place it on the cooling rack.

As the dough cools a bit, spread the mustard and goat cheese on top (though I will say this tastes great without mustard), then top with the onions and pear. Place under the broiler until you like the look of the melty cheese and the browning pears, 3-5 minutes.

Toss your greens with the oil and vinegar, salt and pepper to taste.

Allow the flatbread to cool for a moment on the cooling rack, then top with the greens. Slice and savor with a glass of chilled pinot grigio. 


1.19.2013

Gnocchi in tomato broth, plus a peasant loaf

I've made gnocchi a few times and each time I remember how easy and how initially time-consuming it is. But one of things I appreciate most about making it is its make-ahead factor. Once you make those little pillows, you can freeze them and have them ready to go for whatever accompaniment you pair them with.

I've always used the Smitten Kitchen recipe for gnocchi. In the cookbook it is coupled with a recipe for tomato broth. I had leftover canned tomatoes from my tomato sauce and basil from the pasta and pizza earlier this week, and leftover vegetable broth from the tomato soup from last Sunday. That worked out well.

Gnocchi is really not difficult to make. It takes just four ingredients: potatoes, egg, flour and salt. You just need to factor in a good couple of hours, though most of it not hands-on. You bake 2 pounds of potatoes. That's an hour. Then you let them cool for about 10 minutes. Then peel them and push them through a box grater (or a ricer, if you've got one). Then let them cool for another 10 minutes before adding the egg, a teaspoon of salt, and then 1 1/2 cups or so of flour - just enough to form a workable dough. Then you divide the dough into as many chunks as you want and roll them into 3/4 inch ropes and cut them into gnocchi bits. You can make them ridged, which I have usually gone to great effort to do with a floured fork in the past, but this time I took a tip from Deb and decided it wasn't all that important. I stuck them in the freezer so I could boil them in more of an on-demand style after tonight's first dish.


For the peasant loaf, I revisited my Artisan Bread in 5 Minutes a Day method and made a mix of white, wheat and rye flours. I'll admit, I'm already thinking how good this leftover bread will taste after it's been panini-pressed with some smoked cheese and peppers - maybe some bacon, too. Today's my last day on the veggie train so I'll be rethinking my ingredients, in both directions.

I've been really encouraged by how much I didn't miss meat this past week. And also by how small my grocery bill was when meat was not on it. It gave me more room to purchase the fancier ingredients I'd normally make substitutes for. Most of all,  I loved having a list of new recipes to try all week long. I now have a nice set of meals to return to when I want to forgo the meat but don't feel like eating pasta, which is what I so often do.

As you can tell, the Sprouted Kitchen and Smitten Kitchen were my main sources of inspiration this week. I highly recommend both of their cookbooks to anyone who enjoys eating well - and maybe being a little adventurous - without having to use pretentious or hard-to-find ingredients.

To all vegetarians out there: respect.

1.17.2013

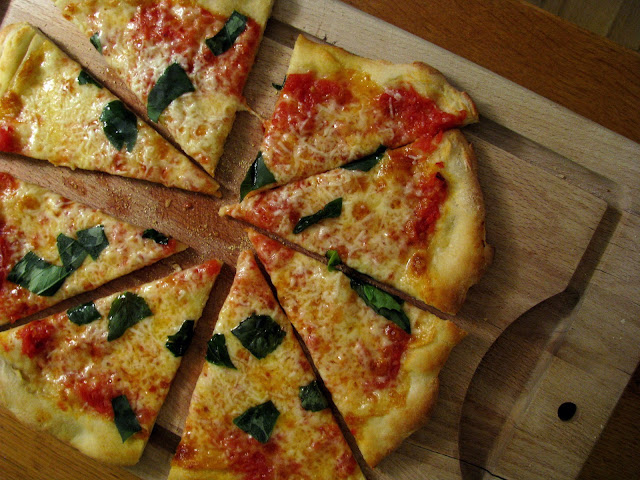
Pizza Margherita

Ten years and a few days ago, I was in Naples for an afternoon. I remember a couple distinct things about it. One, the men were  everything I heard they were: attractive and inappropriate. They eyed me up and down as I walked past them, at which point I stopped making eye contact with any of them, though I really wanted to. And two, the pizza was delicious. I wish I had more pizza experience at that point in my life, and for that reason I don't feel I can say it was the best I've ever had. But no matter; I knew even then that eating pizza margherita in Naples was special. 

In honor of that decade milestone and how quickly time passes, I made pizza margherita tonight.

I love pizza. Pizza is among the top reasons I work out. While there are a couple places I frequent for a good pie here in town, I have really grown to love making it myself. The dough is easy, and my no-recipe sauce is something I've become a little bit proud of. I cook down some canned tomatoes and some of their juices with wine, herbs, salt and a little sugar. But after tonight, I've learned a new great way to make sauce that's a bit more fresh. I'm sold. It's from the Smitten Kitchen cookbook and it calls for pureed fresh or canned tomatoes, some red pepper flakes, garlic and salt, stirred together. No simmering required. I feel like I've been making things so complicated, until tonight.

I also used Deb's recipe for rushed pizza dough (also in the book).  Which was great, because as I said, I work out for pizza, so I came home, made the dough, stuck it in a warm oven and did my exercise routine in the half hour it took took to rise.

I had plenty of basil leftover from last night's pasta, so it was a perfect night to make this.

Pizza margherita is just tomatoes, basil and mozzarella, and on this pizza I sprinkled a small handful of Pecorino as it came out of the oven, per the Smitten Kitchen recommendation. Win win win.

On this 25-degree day in Spokane, when hoarfrost iced each and every tree branch and laced the edges of dead leaves, I sat in my toasty little house and remembered when I was 20 and looked out over the Mediterranean and thought about how my life had led up to that very moment, feeling warm and well-fed.


1.16.2013

Roasted clauliflower capellini

For breakfast, I often eat a poached egg with spinach and avocado. I usually feel pretty good by lunchtime, and I firmly believe that when I have an egg for breakfast I am setting my day on the right course. This week I've been eating this every day to ensure I get a decent amount of protein, which is something I don't pay much attention to otherwise - though I should.

Today was my first restaurant outing. I had a business lunch and the vegetarian options for lunch were salads, or you could substitute portobellos for burger patties. Having just had portobello, I opted for a roasted pear and beet salad. And by around 2 p.m., I felt done for the day. My head was throbbing, my body felt limp and I worried I was coming down with something. It occurred to me on my drive home that perhaps the salad wasn't sustaining me like I hoped it would.

I came home, poured a glass of wine, cut a piece of brie and started making this dinner. I instantly felt better. I think what I was suffering from was Merlot deficiency.

Roasted cauliflower capellini
This recipe - another from the Sprouted Kitchen - will not be for everyone. I know someone who would say "no" as soon I said "whole wheat pasta."  As well as "hazelnuts." But I found this ensemble incredibly satisfying, and I probably would not be such a fan of it were it not for the nuts. Every bite I got with every element - the cauliflower, hazelnuts and basil - was really very good. Any time a recipe calls for roasting a vegetable, I'm for it.

The whole process goes very quick. I toasted a handful of chopped hazelnuts in a pan first. The cauliflower, tossed with olive oil, lemon pepper and salt, began to caramelize in the oven much quicker than the recipe said - about 20 minutes. Toward the end of the roasting, the water on the stovetop began to boil, and it took less than 2 minutes to get the pasta to al dente. It was barely enough time to swirl up some browned butter in a saucepan, which is where you place the drained pasta (with some of the water), toss with the cauliflower and hazelnuts, and sprinkle with basil ribbons and shaved Parmesan.

I added a good pinch of salt to my dish, but otherwise, it was a nice recipe that felt very elegant to eat.

The recipe can be found online here.

1.15.2013

Portobellos with kale and creamy millet

That's right, I said, "millet." Creamy millet. 'Tis the week, friends. I'm trying it all. Maybe millet's not a big deal to you, but to me, my only association with millet has to do with those handsewn millet sacks you warm up in the microwave and use as a heating pad. Also, birdseed.

It turns out that millet can be consumed by humans and it can be delicious. When cooked in milk, seasoned with thyme and nutmeg, and sprinkled with cheese, it is divine. After tonight, I feel safe in classifying this stuff in the same category as polenta and maybe even risotto.

Now, portobellos - I have loved these meatiest of mushrooms for years. Ever since I lived in a house with a bunch of gourmets who threw these on the grill during our backyard barbecues, I've been a believer. To this day, if I see a portobello-anything on the menu at a restaurant, I'll probably order it. I love their toothiness and how well they absorb flavor.

Finally, kale. Will the world ever get over kale? Not likely. There are a million ways to eat your vegetables, but there's just something about kale that makes you feel like you're doing something right with your diet. Add kale to anything and it becomes special because it's more healthy than it needs to be.

Put them all together and it's rather romantic.


I made this just like the picture from the Sprouted Kitchen cookbook. If you'd like the recipe, it's published here on Epicurious. It's worth using every ingredient it calls for. I even spent a whopping $10 on some nice white balsamic vinegar which I'm now excited to use on my salads (it's mild and sweet, a bit less syrupy than regular balsamic). And I found a nice little wedge of Amish Gorgonzola for $2. Otherwise, this recipe mostly consists of ingredients I already have (well, aside from the millet and portobellos).

This was a winner. The kale, after being roasted a few minutes with the mushrooms, was crisp on the edges but tender and flavorful. The mushroom was juicy, though I probably could have roasted it a few minutes longer. The millet was indeed creamy. The fresh thyme really made it. Veggie victory.

1.14.2013

Veggie Week, day 2

This is so fun!

I don't feel like I'm sacrificing much in the way of food, though that wasn't really the point of this week. The point was to think a little differently. Usually when I set out to make dinner, it revolves around a meat item: pork, chicken thighs, ground turkey, usually. So it's nice to learn to center a meal around a vegetable.

Like tonight's dinner, which was leek fritters (Smitten Kitchen).

Let me say here that fritters, and fried food in general, should not be photographed in anything but natural light, and even then, it's questionable. And also that the camera I'm working with this week is a point and shoot. So while my eyes gazed down at this delicious dinner I prepared for myself on this dark, cold evening, it did not translate well to pixels.

But you get the idea. It was delicious. The fritters themselves had a very mild flavor, but combined with the lemon cream, they were heavenly. You just boil some sliced leeks (white and light green parts) in salted water for a few minutes, ring it out in a dish towel (careful, I almost burned myself), and stir it up with a little flour, egg, cayenne, salt and pepper. And then drop them by the spoonful (you choose the size) and fry them in a cast iron in olive oil.  Ms. Perelman suggests putting them in a 250-degree oven for about 10 minutes after frying them to ensure they're crisp and cooked. That gives you enough time to do the dishes and whip up the dip of sour cream (I used plain Greek yogurt), lemon juice and a pinch of zest.

You'll recognize the soup as last night's leftover. Yum.

1.13.2013

Vegetarian for the week

One of my Day Zero goals is to eat vegetarian for a week. Today (Sunday) was my first day not eating animals.

I'm relying a lot on my new cookbooks for inspiration, and this first night's dinner was based on the Sprouted Kitchen's roasted tomato soup.

This not being a season to find beautiful, ripe tomatoes, however, my major departure from the recipe was in using canned tomatoes. I'd love to try this again in the summer and use the recipe as written. Nevertheless, this was simple, delicious and perfectly savory.

So, with these major changes and a few other minor ones, here's my adaptation:

Tomato soup with roasted garlic and onion
Adapted from the Sprouted Kitchen
1 yellow onion
4-5 garlic cloves, peeled
1 28-oz. can whole plum tomatoes + 1 14-oz. can diced tomatoes, drained (or whatever combination gets you about 2 lbs. tomatoes)
1 1/2 c. vegetable broth
2 T. tomato paste
1/3 c. heavy cream
salt and pepper
olive oil
sugar
fresh parsley (or basil)

Preheat oven to 350 degrees. Cut onion into wedges, toss with a drizzle of olive oil and a sprinkle of salt and pepper, then spread out on parchment-lined baking sheet. Place garlic cloves and a dash of olive oil on top on a small sheet of tin foil and wrap it up into a package. Place both onion sheet and garlic package in the oven to bake for about 25 minutes. Watch so the onions don't char. Remove both items from oven and set aside while you prepare the soup base.

Heat broth in a large saucepan and as it begins to simmer, add the tomato paste. Stir a bit so the paste dissolves. Add the onions, garlic and drained tomatoes. Simmer for a few minutes.

Use a blender to puree the soup, then add the cream and stir to combine. Add salt and pepper to taste, and a pinch or two of sugar if it tastes a bit too acidic. Serve with chopped parsley and Parmesan toast (lightly brush olive oil on a slice of baguette, top with freshly grated Parmesan and place under the broiler for a couple minutes, until cheese is melted).