This dress has been on my "to-make" list for a couple of months, and I wish I hadn't dawdled so long. It's the first time in months I've used a non-Seamwork pattern, and it was so clearly written that I never found myself starting at the pattern trying to interpret the instructions. That could also mean I'm getting better at reading patterns.
The pattern is Hinterland by Sew Liberated. I had my printshop print it out for me and then I assembled it, taped it, and cut it out, just like all the patterns I've made this year. There was nothing complicated about it - very few markings and basic shapes. I made the sleeveless half placket version with a tie in the back.
It's meant to be kinda frocky, which is exactly the kind of thing I like to wear in the fall with opaque stockings.
I wouldn't change anything about this pattern except for maybe a guide for where to place the buttonholes (because late-night math...I had to re-do a couple of them and the spacing is still a little off), and I'd add a tiny bit of length to the placket - mine didn't extend much past the neckline which made it difficult to work with and there's a little wrinkle in the top because of that.
The fabric is a gray striped chambray from Sewing Studio in Portland, heavy enough that it doesn't need a lining. Maybe in the summer I'll wear just the dress with a cardigan, but for this season it's sweet with a long-sleeve, maybe collared shirt underneath.
Showing posts with label Sewing. Show all posts
10.13.2019
7.23.2019
Notes on Bobby
I made myself a new dress! It's the Bobby pattern from Seamwork, and the first dress I've made with stretchy jersey knit fabric, a.k.a. my most daunting project to date.
And yes, it was a good challenge. So let's start with all the challenges I faced.
1. Jersey knit fabric, part 1: After pre-washing and drying, the edges curled under. I ironed the fabric but it didn't tame the curl. I researched this a little and learned this is just a characteristic of jersey knit fabrics, and one trick is to use a boatload of spray starch. I have a can of it from a wreath project,but I absolutely hate the smell of it and how it has turned portions of my ironing board brown. So I did my best to just work with the curl, sans starch.
2. Jersey knit fabric, part 2: When I attempted to fold the fabric to lay out the pattern pieces, not only did the curling make it difficult, but this fabric was clingy. I had to have a second person (named Joel) help me try to straighten it out, and even then, it was wonky. This was also combined with the challenge of...
3. Working with stripes. Why, oh why did I pick stripes?! I know why - I love stripes. But trying to match them, especially when they're thin, is no easy feat.
4. The pattern called for stay tape to prevent stretching along the neckline, but I didn't realize there are different kinds, and because I didn't want to make another trip to Joann, I found some scraps of lightweight fusible interfacing to cut into strips for this purpose. This caused me much stress as it was the first step, and I worried I was messing up this dress from the get-go.
5. Sewing with knits. I actually found this less daunting than I thought in terms of not trying to stretch as I sewed. I used a ballpoint needle, and I tested different stitch lengths, widths and tension on scrap fabric to find the combination that worked best. I also used a twin ballpoint for hemming, and that was fun. I ended up learning more about my machine and all the bells and whistles it came with which I had no idea about before. Much love to my mom for buying me my little powerhouse Kenmore 15 years ago!
6. Seam-ripping. Because of course no garment is made without a few re-dos. I found that zigzag stitches are a little easier and quicker to rip out than straight stitches.
7. Burrito lining. The bodice is lined, so I got to use this slick trick for sewing up the arm holes, which just made me crave burritos.
In summary, I love this dress. It fits like a dream and is so comfy. These were all good opportunities to learn, and reasons why my sewing hobby has been rekindled. And yes, the stripes miraculously match! I think I’m going back to wovens for my next project but my fear of knits has lessened for the moment, as has my fear of lining.
I am also loving the Seamwork subscription and community. I posted these notes and photos there as well and received great encouragement from the designers and other sewists, and their video tutorials are extremely helpful. It is $9/month well spent.
| This person just spent most of the day inside |
And yes, it was a good challenge. So let's start with all the challenges I faced.
1. Jersey knit fabric, part 1: After pre-washing and drying, the edges curled under. I ironed the fabric but it didn't tame the curl. I researched this a little and learned this is just a characteristic of jersey knit fabrics, and one trick is to use a boatload of spray starch. I have a can of it from a wreath project,but I absolutely hate the smell of it and how it has turned portions of my ironing board brown. So I did my best to just work with the curl, sans starch.
2. Jersey knit fabric, part 2: When I attempted to fold the fabric to lay out the pattern pieces, not only did the curling make it difficult, but this fabric was clingy. I had to have a second person (named Joel) help me try to straighten it out, and even then, it was wonky. This was also combined with the challenge of...
3. Working with stripes. Why, oh why did I pick stripes?! I know why - I love stripes. But trying to match them, especially when they're thin, is no easy feat.
4. The pattern called for stay tape to prevent stretching along the neckline, but I didn't realize there are different kinds, and because I didn't want to make another trip to Joann, I found some scraps of lightweight fusible interfacing to cut into strips for this purpose. This caused me much stress as it was the first step, and I worried I was messing up this dress from the get-go.
5. Sewing with knits. I actually found this less daunting than I thought in terms of not trying to stretch as I sewed. I used a ballpoint needle, and I tested different stitch lengths, widths and tension on scrap fabric to find the combination that worked best. I also used a twin ballpoint for hemming, and that was fun. I ended up learning more about my machine and all the bells and whistles it came with which I had no idea about before. Much love to my mom for buying me my little powerhouse Kenmore 15 years ago!
6. Seam-ripping. Because of course no garment is made without a few re-dos. I found that zigzag stitches are a little easier and quicker to rip out than straight stitches.
7. Burrito lining. The bodice is lined, so I got to use this slick trick for sewing up the arm holes, which just made me crave burritos.
| Burrito lining pre-stitching |
In summary, I love this dress. It fits like a dream and is so comfy. These were all good opportunities to learn, and reasons why my sewing hobby has been rekindled. And yes, the stripes miraculously match! I think I’m going back to wovens for my next project but my fear of knits has lessened for the moment, as has my fear of lining.
I am also loving the Seamwork subscription and community. I posted these notes and photos there as well and received great encouragement from the designers and other sewists, and their video tutorials are extremely helpful. It is $9/month well spent.
5.30.2019
Made in May
I've been working on my wardrobe, but there's not much to show for it. But I reached the finish line on my May Cardigan, before June 1 as hoped!
Below shows the moment when I realized how this cardigan actually comes together, because until this point none of it made sense to me. Maybe you can see why I was confused. There's nothing left to knit when you get to this point. It's all a matter of stitching seams together.
I love the finished product, even though it's still not technically finished until I finish the sleeves with a short ribbed edge. We all should have more short-sleeve cardigans in our lives. It feels a little like a shawl, which prompted Joel to suggest I call it a "shardigan," to which I suggested a "carl."
In other news, have I mentioned my Year of Martha on here? It was a half-joking (as I try to perfect my Martha Stewart impression)-but-actually-serious goal I made in December to try to make all sorts of different things this year. My white wreath was part of this campaign - it was an actual Martha Stewart craft, which was when I realized how crappy her craft instructions are. I still want to make a sugar scrub and do a small embroidery project. I put a modest Pinterest board together here. I'm pleased that I've made two of the sewing projects, which shows just how drawn my attention has been to sewing. And I just received the Hearthwarming Stocking kit from Knitpicks I pinned on there, and for once I'm really planning ahead with knitting...for Christmas!
It's also worth noting that I made a skirt last weekend that I just didn't end up liking and will therefore donate. I think the fabric I chose was mostly to blame - a cheap couple yards of linen blend from Joann. It had a funny drape that made my waist look especially disproportionate to my lower half. But the actual sewing of it was successful, and I felt good about the process. I only spent a day on it, so it wasn't a huge waste of time.
In other news, have I mentioned my Year of Martha on here? It was a half-joking (as I try to perfect my Martha Stewart impression)-but-actually-serious goal I made in December to try to make all sorts of different things this year. My white wreath was part of this campaign - it was an actual Martha Stewart craft, which was when I realized how crappy her craft instructions are. I still want to make a sugar scrub and do a small embroidery project. I put a modest Pinterest board together here. I'm pleased that I've made two of the sewing projects, which shows just how drawn my attention has been to sewing. And I just received the Hearthwarming Stocking kit from Knitpicks I pinned on there, and for once I'm really planning ahead with knitting...for Christmas!
| Real-life craft room: various states of sewing, knitting, decorating |
It's also worth noting that I made a skirt last weekend that I just didn't end up liking and will therefore donate. I think the fabric I chose was mostly to blame - a cheap couple yards of linen blend from Joann. It had a funny drape that made my waist look especially disproportionate to my lower half. But the actual sewing of it was successful, and I felt good about the process. I only spent a day on it, so it wasn't a huge waste of time.
Finally, this weekend I'll be on the East Coast and hope to finish the pair of Hermione Everyday Socks I've been working on since around January, in transit. Can I do it?
5.03.2019
Made in April
April was a good month. I've been using my internet time at home almost exclusively to look at fabrics and patterns. I purchased a subscription to Seamwork for $9 per month which gives me access to really lovely patterns, perfect for people like me who are in it to learn and want wardrobe staples. There's a supportive community network there, and great Instagram coverage of these completed patterns from fellow sewists, which inspires me even more.
Here are a few things I've learned lately:
1. How to assemble and cut a print-out pattern on regular ol' paper. It felt daunting at first, but it's something that's easy to do while I listen to a podcast, and it takes maybe 20-30 minutes, depending on the size of pattern. I also learned the importance of the little 4x4 test square to make sure my print-out was at the correct size. Otherwise, it's a simple matter of cutting the pages to size and taping them together, then cutting out the pieces as I would a normal pattern.
2. Use pattern weights and tracing instead of pins. This is a game changer! When I first started sewing, I did as my mom does by laying the fabric on the floor and pinning the pieces in place. I couldn't figure out how to do this without wrinkling the fabric or occasionally pinning the fabric to the carpet. Worse, my back would be killing me the next day. (Mom, I don't know how you do it!) Now I use our dining table and place the weights on the pattern pieces, trace and note markings (ink disappears in 24 hours or less), then cut it out. My back is saved and my cutting is more accurate. Someday I want a cutting mat and rotary cutter to make it even easier.
3. If I find a pattern I like, make it again. I get better and faster with each one, and I cement techniques that I use in other patterns.
4. Finish the seam allowances. I'm still trying to figure out the best technique for my sewing machine, but so far I've been using a zigzag stitch to finish.
5. How (and why) to cut and sew on the bias. This video was really helpful. All my patterns so far have involved bias necklines and arm holes and it was kind of a mystery to me how it all worked.
6. Topstitching. I'm getting better at it.
7. Pay careful attention when you're using fabrics whose right sides and wrong sides are alike! This is the cause of most of my seam ripping.
After three rounds of Grainline Studio's Willow tanks this year, this month I tried Seamwork's Sorbetto. I love the box pleat down the center. Also, the white bias tape was kind of a happy accident. I didn't realize the bias tape would show (my most recent pattern folded the main fabric over the bias tape), and I had a fleeting thought as I was pinning it, "This would actually look kind of cute to have this white contrast," and lo and behold, I had no choice. Next time I'll make matching bias tape.
Just prior to that, I made this dress, Veronica, over a couple Sundays. I didn't do any adjustments to the sizing and crossed my fingers that the measurements specified would be my end result, and like a miracle, they were. The armholes feel a little big and I definitely had some issues around the neckline and sleeves, so you can see some tiny wrinkles if you want to stand close and judge. However, I was really proud of myself for figuring out the partial elastic waist and waistband. Joel got to hear me at my best, smartest self as I talked myself through the steps, second- and triple-guessed myself, until I declared I had figured it out at last, only to take it back a minute later. This process did entail some seam ripping and neck aches as a result.
Here are a few things I've learned lately:
1. How to assemble and cut a print-out pattern on regular ol' paper. It felt daunting at first, but it's something that's easy to do while I listen to a podcast, and it takes maybe 20-30 minutes, depending on the size of pattern. I also learned the importance of the little 4x4 test square to make sure my print-out was at the correct size. Otherwise, it's a simple matter of cutting the pages to size and taping them together, then cutting out the pieces as I would a normal pattern.
2. Use pattern weights and tracing instead of pins. This is a game changer! When I first started sewing, I did as my mom does by laying the fabric on the floor and pinning the pieces in place. I couldn't figure out how to do this without wrinkling the fabric or occasionally pinning the fabric to the carpet. Worse, my back would be killing me the next day. (Mom, I don't know how you do it!) Now I use our dining table and place the weights on the pattern pieces, trace and note markings (ink disappears in 24 hours or less), then cut it out. My back is saved and my cutting is more accurate. Someday I want a cutting mat and rotary cutter to make it even easier.
3. If I find a pattern I like, make it again. I get better and faster with each one, and I cement techniques that I use in other patterns.
4. Finish the seam allowances. I'm still trying to figure out the best technique for my sewing machine, but so far I've been using a zigzag stitch to finish.
5. How (and why) to cut and sew on the bias. This video was really helpful. All my patterns so far have involved bias necklines and arm holes and it was kind of a mystery to me how it all worked.
6. Topstitching. I'm getting better at it.
7. Pay careful attention when you're using fabrics whose right sides and wrong sides are alike! This is the cause of most of my seam ripping.
After three rounds of Grainline Studio's Willow tanks this year, this month I tried Seamwork's Sorbetto. I love the box pleat down the center. Also, the white bias tape was kind of a happy accident. I didn't realize the bias tape would show (my most recent pattern folded the main fabric over the bias tape), and I had a fleeting thought as I was pinning it, "This would actually look kind of cute to have this white contrast," and lo and behold, I had no choice. Next time I'll make matching bias tape.
Just prior to that, I made this dress, Veronica, over a couple Sundays. I didn't do any adjustments to the sizing and crossed my fingers that the measurements specified would be my end result, and like a miracle, they were. The armholes feel a little big and I definitely had some issues around the neckline and sleeves, so you can see some tiny wrinkles if you want to stand close and judge. However, I was really proud of myself for figuring out the partial elastic waist and waistband. Joel got to hear me at my best, smartest self as I talked myself through the steps, second- and triple-guessed myself, until I declared I had figured it out at last, only to take it back a minute later. This process did entail some seam ripping and neck aches as a result.
But also, I'm still knitting. I would show you progress on my May Cardigan, but right now it looks like a giant L and I'm not sure how it all comes together. But I know, based on yarn yardage, that I'm at least two-thirds done. My goal is still to complete it by June 1.
2.10.2019
Just sewing tank tops over here
It's funny how, now that I've stopped (for the time being) posting weekly recaps, I feel stuck with figuring out what to write about, trying to figure out if there's a point I want to make when I sit down to write. If you've read this blog for any length of time, you might be grateful I'm finally giving this idea some thought. This is probably a good practice, but my brain just isn't producing this right now.
I wanted to write something about how I've made a bunch of stuff so far this year (go, me!) but I'm not sure what it all means other than that I have a lot of time on my hands. And that I'm fulfilling a 2019 goal to diversify my crafting. The end.
The truth of it is I have been on cold medicine for the better part of a week and I am grateful to be on the other side of it. I filled a whole Banana Republic bag (the shopping spree kind) with Kleenex. I watched Mrs. Maisel and New Scandinavian Cooking and sad stuff on PBS Create that reminds me I'm a sick person lounging on a couch.
I am consciously thinking about things that give me daily pings of pleasure: the sound of separating orange portions; the softness of Margot's belly; snow that feels like styrofoam when you brush it off the car; the moment when bias facing miraculously fits the neckline you're sewing.
Yes, between nose blows and lie-downs I cut and pieced together fabric for my summer wardrobe, on the eve of the latest, seemingly endless snow forecast.
The weekend before I came down with the crud, I made my first Willow Tank over the course of about six hours. Shocked that it actually turned out, I vowed to take that momentum and repeat the process in half the time. I did better: I made Willow #2 in 2.5 hours, a few days later.
Here's the first, made with a shirting fabric I found at Joann:
The second was made with linen, also found at Joann:
These are the first clothing items I've made so far that don't feel like something I've sewn. If you know what I mean. I am not conscious of things I could have done better, they actually fit like something I would buy, and I am really happy with how they feel.
It's a good trend and THE POINT OF THIS POST is to remember I can do this.
I am consciously thinking about things that give me daily pings of pleasure: the sound of separating orange portions; the softness of Margot's belly; snow that feels like styrofoam when you brush it off the car; the moment when bias facing miraculously fits the neckline you're sewing.
Yes, between nose blows and lie-downs I cut and pieced together fabric for my summer wardrobe, on the eve of the latest, seemingly endless snow forecast.
The weekend before I came down with the crud, I made my first Willow Tank over the course of about six hours. Shocked that it actually turned out, I vowed to take that momentum and repeat the process in half the time. I did better: I made Willow #2 in 2.5 hours, a few days later.
Here's the first, made with a shirting fabric I found at Joann:
The second was made with linen, also found at Joann:
These are the first clothing items I've made so far that don't feel like something I've sewn. If you know what I mean. I am not conscious of things I could have done better, they actually fit like something I would buy, and I am really happy with how they feel.
It's a good trend and THE POINT OF THIS POST is to remember I can do this.
12.07.2014
My new go-to baby shower gift
After I first learned how to knit, I routinely knit baby booties to give to expectant mothers. They are quick to knit up and there's something so fun about holding a little baby bootie, knowing a little baby foot will go in there.
Then I found a sewing pattern for terrycloth-lined baby bibs on Purlbee. The booties are quick, but these are even quicker, and it's easy to make four at a time with just a half-yard of terrycloth. So...it's cheap. I went to my favorite fabric store and picked out 4 different fat quarters (you only need a fat eighth), which kind of made my day. I'm not a quilter, but I'm always looking for projects that use just a little bit of fun fabric like this.
I made the mistake of cutting the pattern before sewing it to the terrycloth, but it didn't harm the end product, other than making it about a 1/4" smaller all around. Next time I'll be sure to follow the directions a little more carefully (sigh...a common theme for me). The longest part of the process was hand-sewing the snaps. Either way, I finished these in about 3 hours. So fun!
Then I found a sewing pattern for terrycloth-lined baby bibs on Purlbee. The booties are quick, but these are even quicker, and it's easy to make four at a time with just a half-yard of terrycloth. So...it's cheap. I went to my favorite fabric store and picked out 4 different fat quarters (you only need a fat eighth), which kind of made my day. I'm not a quilter, but I'm always looking for projects that use just a little bit of fun fabric like this.
I made the mistake of cutting the pattern before sewing it to the terrycloth, but it didn't harm the end product, other than making it about a 1/4" smaller all around. Next time I'll be sure to follow the directions a little more carefully (sigh...a common theme for me). The longest part of the process was hand-sewing the snaps. Either way, I finished these in about 3 hours. So fun!
4.28.2014
Crafty birthday week
The past week has been a chilly mix of rain and sun, so most of it has been spent in this room, or outside with the dog.
Yes, a dog! She came with the name of Luna, which we thought we would change, but now we've called her "Luna" all week and I'm not sure if a new name is meant to be. We have a full slate of options, though. My favorite so far is "Vesper." Name aside, she's been very easy and sweet and fun. Margot has taken to her, too.I'm always adjusting these candles, but it's a losing battle to keep them straight.
This is what happens when you take your birthday off, and it's cold and rainy and you're not quite sure what to do with yourself. The past couple years have spoiled me with warm weather, so this year really threw me off. It ended up being a nice day despite the weather, with friends in the living room and a fire in the fireplace.
Soft-boiled egg making.
Birthday flowers.
My ultimate comfort meal. Plain toast and a soft-boiled egg. Plus a latte.
I wasn't the only one celebrating a birthday this week.
The birthday flowers, nearly spent.
Mom and Dad sent me some old treasures. My mom thinks these were given as a gift to my Oma by one of her customers at the National Tea. The white and aqua color scheme has been appearing a lot in my life lately. I love it.
This hobnail budvase was the first thing my mom remembers buying with her own money - at age 10, for her mom's birthday, for 10 cents. I've always loved it.
Yawn.
I feel like this, too. We're ready for some sun and warm days.
Meanwhile, outside...
Joel's used the spurts of dry weather to complete this awesome Cornhole set, which he and his dad built a couple weekends ago. He spent all weekend painting and finishing it.
Margot kept an eye on him.
And I finished a baby sweater. This was the blocking process.
Now that the Cornhole set is finished, I am making the cornbags.
The forecast is showing some sun and 70 degrees. We're ready!
2.10.2011
Cheer-up skirt
![]() |
| New Look Pattern #6872 |
I awoke to rain that Monday. It was a holiday, but I pretended it was a regular workday and got up at 7 a.m. (which is later than I should get up on a work day, admittedly). The morning was spent in The Kraft Zimmer, in my pajamas. I plugged in the sewing machine, the stereo and all the bright lights I had. After about 2 hours, the gray skies had given way to intense sunshine, and the fabric pieces I was working on had shed their tissue paper patterns and had begun to look like an actual skirt. Like, a really cute one.
I allowed myself a bathroom break and realized the state of affairs with my appearance was quite inconsistent with the general feeling of well-being and optimism. Prescription: shower and fresh air.
The fresh air was truly a treat. With a Paris guide in my bag and a coffee shop within walking distance, I set out to nearly ruin the effect of my shower by overdressing myself in winter accessories. On my walk, I took special note of houses in the neighborhood that I don’t often see or look at, wondered what it’s like to live in those places, envied the sunlight many of them get on their summer gardens, and felt a nice hint of sweat forming under my hat and on my upper lip, almost as though it were summer. Somehow, a hot cup of coffee was still appealing by the time I got up to the shop. I settled in by the window and read through Rick Steves’ recommended walking tours. I wondered if the people around me thought I was nerdy, lucky, or both.
Properly buzzed and filled with a better sense of both Paris and my own neighborhood, I returned home and finished my skirt.
I’m not about to tell you I used all the right techniques here, or that it exemplifies a good deal of skill, but here’s what I’m most excited about: this is the first skirt I’ve made that truly fits me! And it has pockets, and it’s the perfect length, and it holds its shape, and it just looks like summertime.
11.02.2010
The elements are coming together, sir.
Do you know how exhausting it is to make your hobbies fit you just right? I recently claimed the front bedroom as my own so that I could keep all my machinery, yarn, guns (the harmless kind that aid in adhering) and scraps in one place. What started as pure joy in having a Kraft Zimmer (I'll explain the name later) quickly progressed to practical paralysis. I suddenly needed more stuff to make the room work, and thinking about it took a lot of energy. I knew that the first step was to downsize and categorize my stuff, and figure out how to make cute boxes and baskets from Target fit all the essentials. Well, I skipped the first part and just headed straight to Target and bought some cute stuff. Lucky for me, though, I was home sick one day and got so bored that I cleaned out the closet and figured out a way to rearrange the entire room in a way that left a nice big hole for a sewing table. I even vacuumed and dusted the window sills.
So, step two was to type "desk" into Craigslist for a week straight and to e-mail strangers in the greater Spokane area. I knew exactly how high I needed my sewing table to be, and how much leg room I needed in order to work the machine without cramping. I needed it to be a certain length, too, or else my fabric would be falling all over the place. So I bought a desk (with cedar drawers!) that seemed to fit all my criteria from an estate sale. (Creepy/sad line from the guy who sold it to me, as I handed him the cheque: "The estate thanks you.")
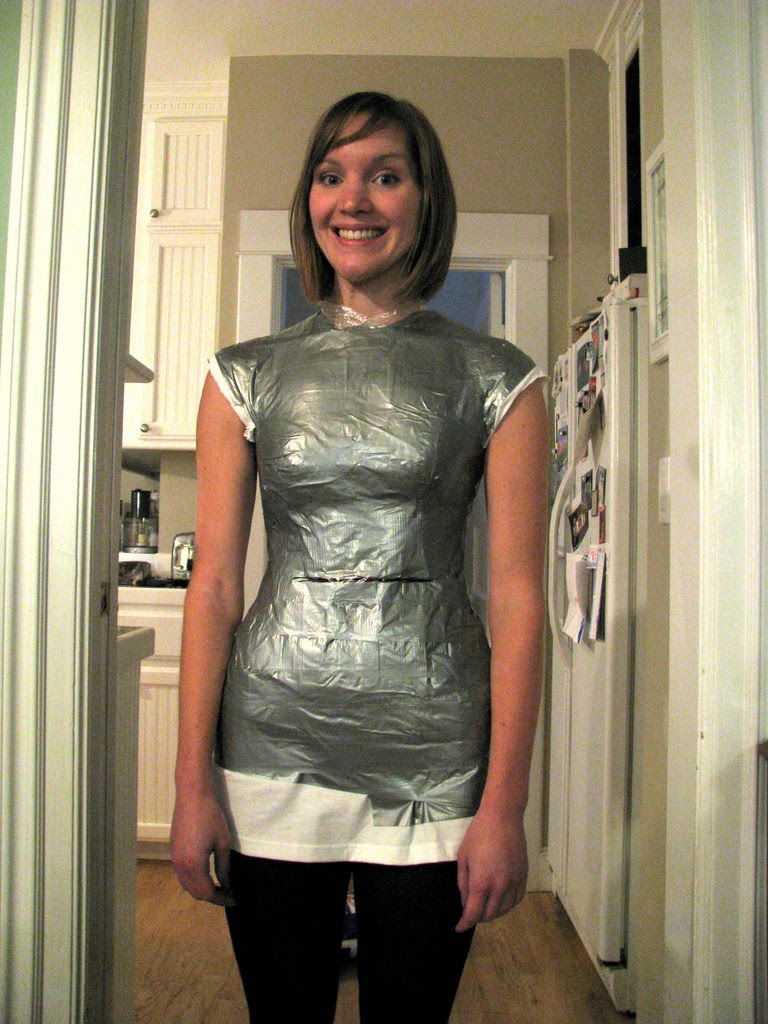
I could have stopped there and started on my sewing projects. But when I get an idea in my head of what I think will make my craft-life easier, I really go after it. Even if it means enlisting my boyfriend to wrap me in three layers of duct tape to get it.
I wanted a dress form THIS badly.
Fortunately, I didn't faint, and Joel still has fingerprints. After marking the waistline and then extracting myself from the form (by cutting down the back), we taped it back up and filled the thing with a big package of polyfill. And now I have a duct tape replica of myself to help make the Kraft Zimmer complete.
I call it the Kraft Zimmer because a.) having a "craft room" makes me feel like I should be bedazzling some denim outfits, and b.) "Kraft Zimmer" means "Power Room" in German, and having a room like this does give me a good deal of power and control over what I wear and what I make, doesn't it?
But then there's the wallpaper. Don't get me started.
5.13.2010
The Socialite
Every summer for the last 3, I have been making summer lists. The first time I made one, nothing was accomplished on it because I was bummed out that friends were leaving and everything had a hint of melancholy to it. I called it my "Summer Bummer" list as many items were prefaced with the phrase "one last" or "last ever."
You might say the following summer was the complete opposite as I built the list with someone who was as excited about summer as I was. Also, I think think the pupils in my eyes were heart-shaped. "Summer Bummer" became "Best Summer Ever" - it pretty much was.
Now whenever May rolls around, I start thinking about my list, trying to top the "best-ness" of the prior year. Road trips, day trips, festivals, concerts, seasonal food celebrations, and lake swimming always make their way on there. So does "make a dress."
You might say the following summer was the complete opposite as I built the list with someone who was as excited about summer as I was. Also, I think think the pupils in my eyes were heart-shaped. "Summer Bummer" became "Best Summer Ever" - it pretty much was.
Now whenever May rolls around, I start thinking about my list, trying to top the "best-ness" of the prior year. Road trips, day trips, festivals, concerts, seasonal food celebrations, and lake swimming always make their way on there. So does "make a dress."
The pattern is called "The Socialite Dress" by Anna Maria Horner. She is a genius. Reading her patterns is like reading regular English. It's like my mom telling me what I need to do and why. Maybe too simplistic for some, but for a beginner like me, it's fantastic.
Another nice thing is that this really was just a simple dress. I literally finished it in the better part of an afternoon. I wear a belt with it for a little extra definition.
I also have huge issues with using the self-timer. Hope you've enjoyed these action shots.
Subscribe to:
Posts (Atom)